Category Archives: Xamarin

VSTS–Mac build agent fail restoring NuGet packages

Heads up if you’re running VSTS build agent on a Mac for Xamarin.Forms iOS projects.

You may see this error message from the NuGet package restore step:
”To connect to NuGet feeds hosted in your Team Services account/TFS project collection with NuGet 3.1 or below, edit your build definition to specify a path to a NuGet.config containing the package sources you wish to use.”
 
And this error message in the agent’s _diag log file on the Mac:
                MsBuild.exe does not exist at ‘/Library/Frameworks/Mono.framework/Versions/4.4.2/lib/mono/4.5/msbuild.exe’.
 
It’s a closed issue on GitHub, but you’ll need to do a workaround.
 
See https://github.com/Microsoft/vsts-tasks/issues/2828 for details. The issue was opened about 10 days ago.
 
I hadn’t changed anything with my build definition, source code, or build agent, but the build failed this morning. (It had been a couple of weeks since I’d run it, and it had always worked before. Quite a surprise.
 
I ended up putting this in the VSTS NuGet package restore step and it resolved the issue for me:

2016-10-17_10-26-36

Note from Joe Sauve:

You can also use:
“/Library/Frameworks/Mono.framework/Versions/Current/lib/mono/nuget/NuGet.exe”

Note the “Current” instead of a specific version number. There should be a symlinked “Current” folder in there that always points to the most recent version.

Thanks Joe!

bliz

Android Keystore file and password in VSTS builds

I was on site with a client last week working with them on DevOps for Xamarin.Forms builds using VSTS. The question came up of what to do about the Android Keystore file and its password – where to put them, keep them safe, etc.

Keystore file
If you’re running the build agent on a local build server (or Azure VM), the keystore file can be placed in a secure location on the build server. If you’re using the hosted build controller the Keystore file could be put into source control with limited access given to that file.

Keystore file password
For the Keystore file password, create a private variable in the Android build definition . Once the variable is set it cannot be displayed again. Then set the permissions in VSTS so only those who have Build Edit permissions can change this variable, and restrict who you give those permissions to accordingly.

clip_image001
The build step with a reference to the Keystore file in VSTS source control and a variable for the password.

image
The Keystore password saved as a Variable in the build definition.

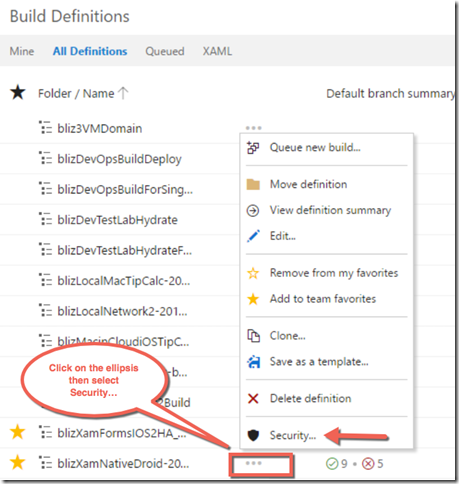
Then you’ll need to set the security on the Build itself to limit who is allowed to edit the build definition.

image

image

And that’s it. Setting up the VSTS build in this way will keep the Keystore file and password safe in your Xamarin Android build definitions.

Enjoy!
–bliz

Building cross-platform Xamarin.Forms apps in VSTS

The other day I wanted to create a DevOps CI / CD pipeline for a simple Xamarin.Forms app that I’d created. The Visual Studio solution contains project files for the PCL, Android, iOS, and UWP projects. The CI / CD pipeline would include VSTS for source control, build, and release, my Mac for the actual compile and packaging of the iOS app, and HockeyApp for beta version management and beta user management. It’s not that difficult to set up, but there are a few places where it would be easy to get hung up.

For my Xamarin.Forms project I created three VSTS build definitions, one for each platform. This allowed me manage the pipeline for each platform separately. Two separate build agents are required to build the solution. The Hosted Pool and Agents can build for UWP, Android, and a number of other platforms, but they can’t build for iOS. A different Pool and Agent has to be set up for iOS, pointing to a Mac environment such as MacInCloud, or to your local Mac.

The solution in Visual Studio needed three Build Configurations: one for Android (without UWP or iOS), one for UWP (without Android or iOS), and one for iOS (without Android and UWP).

VSTS Agents and Build Definitions

So with that, let’s take a look, first with the VSTS Build setup. . . (FYI, I’m currently not using Release Management to publish the app to HockeyApp. I’m going to add that process later.)

I downloaded an Agent to my Mac and configured it to run using a pool other than the Hosted pool. I chose to use default pool. In the following image you can see that I have a number of Agents defined in the “default” pool. “MIC_VSTS_snow…” is set up to use MacInCloud. The other three point to different Agent configurations on my local Macs. (I’m going to write a future post about how I configured the Agent on my Mac.)

image

I defined a User Capabilities variable for each Agent so my build definitions could demand which particular Agent to use from the default pool. For instance, I created a User Capability called MacinCloud for the agent associated with MacInCloud. I created a Capability called NewMac for one of the agents that lives on my MacBook Pro.

image image

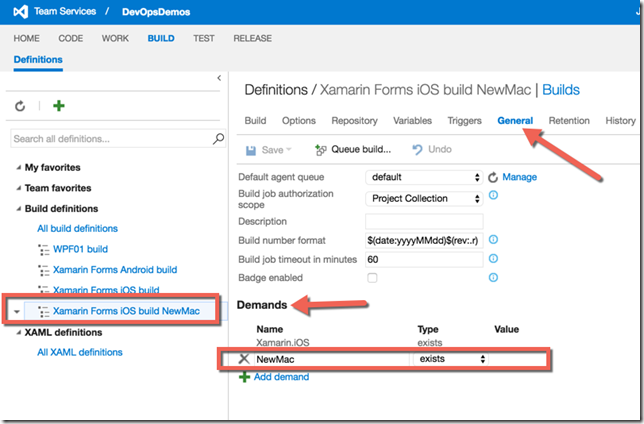
In the VSTS build definition I added a Demand for “NewMac” “exists” so it will run a particular agent on my MacBook Pro. (You can have multiple agents running on your Mac if you want to, and point to them this way.)
image

In my build definition I also created a variable called BuildConfiguration so I can identify which which Build Configuration in the VS solution I want the VSTS build to use. (I’ll show those settings in VS in just a bit.)

image

I pointed the build to my Xamarin project repo and set it to have a continuous integration trigger. In the Build Task I used the $(BuildConfiguration) variable for the Configuration.

image

I set up the Android and UWP VSTS build definitions similar to the iOS definition. Biggest difference was that I was able to use the Hosted agent.

Visual Studio Build Configuration

Let’s take a look at the Build Configuration in Visual Studio next.

As I mentioned I created three VS build configurations to be used by the three VSTS builds, “iOS Release”, “Android Release”, and “UWP Release”. In the VSTS build definition for iOS above, I used the “iOS Release” configuration. Here’s the definition in Visual Studio. The “XamarinFormsIosAndroid” project is the PCL project, and the “XamarinFormsIosAndroid.iOS” project is, yep, the iOS project. Notice that the Droid and UWP projects are not set to build (checkboxes are unchecked) in this configuration.

image

For the Android and UWP build configurations I took the same approach: build the PCL project and the .Droid or UWP project as appropriate. Here’s the screenshot for the Android build. Notice that I left the “Deploy” checkkbox unchecked for the .Droid project. There’s no need to deploy it during the Build task in VSTS.

image

And that’s pretty much it…. at least as far as setting up the build goes.  : )

I haven’t shown it here, but you can add a step for Xamarin Test Cloud (automated testing) and a step for deployment to HockeyApp (for beta distribution and user management). Or even better, create a Release Management definition to handle the deployment to HockeyApp. More about those topics in a future blog posts.

References

Here are some references you’ll probably find useful when setting up your VSTS builds for Xamarin.Forms.

Enjoy!
-bliz

Identifier field in Xamarin iOS app project properties

I’ve been working with Xamarin.iOS for Visual Studio for a while now, and I’ve always wondered what the “Identifier” field really does. I heard something about using reverse domain name naming convention, but didn’t know why. Not having an iOS device, I’ve always tested on the iOS simulator, and I’d make up some random Identifier, such as “com.foo.bar”. The simulator didn’t complain, so I carried on in ignorance.

(Even though I simply made up an Identifier, while working in VS 2012 with Xamarin.iOS I quickly learned to always populate that field, plus the Application name and Version fields. If they’re empty when you send the app to the simulator, the simulator will barf all over you. Then you’ll have to dig around in Finder to weed out the bad app from the simulator folder structure. Ick. Nice recent update with Xamarin.iOS — it now will give a compiler error if those fields are empty when you build. Thanks, Xamarin!)

I found out this evening while digging around that the Identifier field is important when you want to test your app on a physical device, or want to publish the app to the App Store.

To use a physical device or publish to the App Store, you have to register an app profile in the Apple Developer site and download / install the profile on the Mac that has the Xamarin Build Host and Xcode. There are 2 ways to go when creating an app profile – one is explicit, defining the app name you’re going to use; the other is “wildcard” which allows you to use a single app ID to match multiple apps.

I create lots of demo apps, so I chose to go with a wildcard app id. That way I don’t have to create a new profile for each and every app I want to demo on a device. I created the app ID using the domain I own, as “com.snowstormlife.*” which allows me to use “com.snowstormlife” followed by any app name I want to give an app.

iOS Identifier property

The Xamarin site has a pretty good set of instructions about all this here: http://docs.xamarin.com/guides/ios/getting_started/device_provisioning/

Note that if you’re simply going to use the simulator instead of a device, it doesn’t really matter what you use in the Identifier property. It’s only important when you’re sending to the physical world or the app store.

Happy cross-platform coding,

-bliz